Travel Trailer Camper Design Review for Embroidery Projects
When I first opened the Travel Trailer Camper embroidery file, I immediately pictured it stitched onto a sturdy canvas tote bag, heading to a weekend market or tucked under someone's arm at a campground gift shop. There is something quietly charming about a retro camper silhouette that taps into a sense of nostalgia without trying too hard. The shape feels recognizable, the proportions read well, and the overall mood leans cozy rather than technical. That matters because buyers respond to feeling, not just thread count.
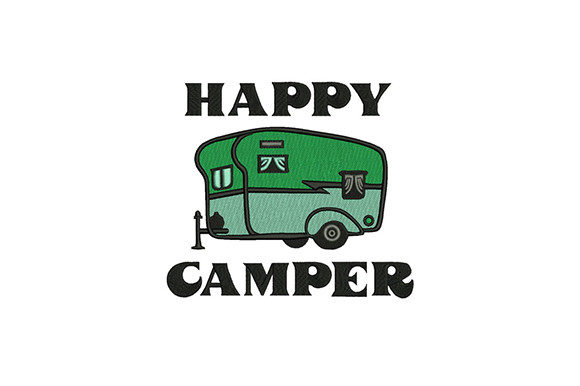
From a design perspective, the Travel Trailer Camper carries a clean, approachable personality. It does not scream for attention, but it holds its own on a product. The curved roofline, the little wheel details, and the compact silhouette give it a handmade postcard kind of vibe. I could see this working beautifully on a kitchen towel hanging in a rented cabin, or stitched small on a baby onesie for a family that loves road trips. It is not overly complex, which is often a good thing when you are thinking about stitch clarity and production speed.
What Kind of Project Naturally Fits This Camper Motif
After studying the layout and the way the shapes break down into stitch sections, a few immediate product ideas came to mind. The Travel Trailer Camper design feels most at home on casual, lifestyle-oriented items. Think about where people actually use camping-themed products. Tote bags, aprons, pillow covers, and unisex sweatshirts all make sense. The theme is broad enough to appeal to families, outdoor enthusiasts, and even boutique shoppers who just like the aesthetic.
I recently tested a similar camping motif on a soft cream sweatshirt for a client who runs a small handmade shop. The feedback was clear: customers wanted something that felt personal but not overly detailed. The Travel Trailer Camper would fit that brief perfectly. It is distinctive enough to spark conversation, but simple enough to appeal to a wide range of buyers. For Etsy sellers, that balance is gold. You want a design that photographs well, stitches reliably, and looks intentional on a finished product.
Tote Bags and Everyday Carry Items
A canvas tote with this design stitched in earthy tones would feel right at home at a farmer's market or a campsite general store. The flat surface of a tote bag gives the embroidery room to breathe, and the design's compact shape means it can sit centered without overwhelming the bag. I would lean toward a medium hoop size here, nothing too small, so the wheel details and window shapes stay crisp.
Apparel and Wearable Projects
On a sweatshirt or a long-sleeve tee, the Travel Trailer Camper brings a low-key, wanderlust feel. I would avoid placing it on highly textured or heavily ribbed fabrics where small details could get lost. A smooth, midweight cotton jersey works best. For caps, I would proceed with caution. The curved surface of a baseball cap can distort the roofline if the design is not digitized with that in mind. Always test on a similar curve before committing to a full run.
Home Decor and Gift Items
Pillow covers, tea towels, and even simple wall hangings come to mind. A linen pillow cover with this design stitched in a muted olive or rust thread would look like a curated boutique piece. For holiday gifts, I could see this paired with a small embroidered text underneath, maybe a family name or a year, turning it into a personalized keepsake. The simplicity of the camper shape leaves room for creative add-ons without making the final product look cluttered.
Stitching Performance and Practical Considerations
Before loading the Travel Trailer Camper design onto any machine, I always recommend a test stitch on scrap fabric that matches the final product as closely as possible. The design uses four thread colors, which keeps the color changes manageable and the production time reasonable. Fewer thread changes also mean fewer stops during stitching, which is helpful when you are running multiple items for a craft fair or an order batch.
Pay attention to the stitch density in the smaller sections. The wheel areas and any narrow connecting lines could become dense if the digitizing packs too many stitches into a tight space. I always check the back of the test stitch for any puckering or stiffness. If the fabric pulls, I adjust the stabilizer before changing anything else. A medium-weight cutaway stabilizer usually handles designs like this well, especially on knit fabrics that want to stretch.
Thread Color Choices and Contrast
With four colors in the palette, you have room to play with contrast. I would test both a tonal version, where the camper blends softly into the background, and a high-contrast version, where the thread pops against the fabric. Dark fabrics need careful color selection. A navy sweatshirt with dark gray thread might lose the camper's shape entirely. On the flip side, a light natural linen with deep charcoal or forest green thread makes the Travel Trailer Camper feel crisp and intentional.
I also like to check how the design reads in black and white. Take a photo of the stitched sample and convert it to grayscale. If the camper silhouette still holds up without color, you know the shape is strong. That kind of test matters when you are creating product photos for an online listing. Buyers scan quickly, and a design that reads clearly even in a small thumbnail has a better chance of catching attention.
Where to Use This Design Carefully
Not every design works everywhere, and the Travel Trailer Camper has a few spots where I would exercise caution. Small hoop sizes might squeeze the details too much, especially the wheels and the hitch area. If the design is sized down aggressively, the satin stitches could bunch up or the fill areas could lose definition. Always check the minimum recommended hoop size before scaling.
Thin fabrics, like lightweight jersey or delicate cotton voile, need extra support. Without proper stabilizer, the stitching could pull the fabric out of shape, especially around the curved roofline. I would also avoid using this on heavily textured fabrics like terry cloth or thick fleece, where the fine details could sink into the pile and disappear.
- Stretchy fabrics: Use a fusible backing to lock the fibers in place before hooping.
- Dark fabrics: Test thread visibility carefully, especially on navy, black, or deep brown.
- Curved surfaces: Caps and hats need a test run to check for distortion on the camper's straight lines.
- Layered garments: Avoid stitching over seams, zippers, or pockets where the hoop cannot sit flat.
- Frequent washing: Make sure the stitch edges are secure so the design holds up over time.
How the Camper Design Affects Product Value and Customer Trust
A well-chosen embroidery design can shift how a customer perceives a handmade product. The Travel Trailer Camper brings a sense of warmth and storytelling that feels more personal than a generic graphic. When someone buys a tea towel with a little camper stitched on it, they are buying the feeling of slow mornings, campfire coffee, and open roads. That emotional layer adds value that goes beyond the cost of materials.
For small business owners, consistency matters. A design that stitches cleanly across multiple products helps build a recognizable brand look. If you sell a camper tote bag, a matching pillow cover, and a coordinating sweatshirt, the collection feels cohesive. Buyers start to associate your shop with that aesthetic, and trust grows with every well-made item they receive.
Commercial Use and Licensing Awareness
Before listing finished products or digital mockups that feature the Travel Trailer Camper design, I always double-check the licensing terms. Some embroidery files come with clear commercial use permissions, while others limit how many items you can sell or whether you can include the design in digital product bundles. The file formats included cover a wide range of machine brands, which is helpful for designers who work with multiple machines or share files with a production team. The available formats include 10O, ART, CND, DSB, DST, DSZ, EXP, HUS, JEF, JEF+, PCS, PEC, PES, SEW, TAP, VIP, VP3, VP4, and XXX, so compatibility is broad.
Still, I always recommend reaching out to the digitizer or checking the product listing details if the commercial use policy is not clearly stated. It is a quick step that protects your business and respects the original designer's work. I have seen too many shop owners get caught off guard by assuming permissions that were not actually granted.
Real-Life Scenario: Preparing a Camper Tote Bag for a Craft Market
Let me walk through a realistic scenario. I am preparing a batch of canvas tote bags for a local craft market, and I want a camping-themed design that feels fresh but not overly trendy. The Travel Trailer Camper catches my eye because it fits the outdoor adventure theme without being too literal. I test it first on a scrap of the same canvas I plan to use. The four-color palette keeps the test quick, and I try two thread combinations: one with a warm mustard and cream palette, and another with cool slate blue and charcoal.
The mustard version wins. It feels vintage and inviting. I stitch six bags, each with the camper centered and slightly raised toward the top third of the bag. The stitch quality is consistent across all six, and the stabilizer holds without making the back of the embroidery feel stiff. At the market, the bags sell out by lunchtime. Customers pick them up, smile, and mention road trips, family campers, or childhood memories. That is the power of a design that connects emotionally.
Designer Notes for a Smooth Workflow
Over the years, I have learned that a few small checks before starting a project can save hours of frustration. Here is a quick list of practical steps I take before using any new embroidery design, including the Travel Trailer Camper:
- Test on scrap fabric first: Match the fabric type and weight to the final product as closely as possible.
- Check thread color contrast: Hold the thread spools against the fabric in natural light before loading the machine.
- Review stitch density: Look for areas that feel too thick or too sparse, and adjust machine tension if needed.
- Confirm hoop size: Make sure the design fits comfortably without crowding the hoop edges.
- Inspect small details: Pay special attention to wheels, windows, and any narrow connecting lines.
- Test on light and dark backgrounds: A design that works on cream may disappear on navy.
- Use proper stabilizer: Cutaway for knits, tear-away for stable wovens, and always test first.
- Verify licensing: Know what you are allowed to do with the finished product before you sell.
The Travel Trailer Camper is one of those designs that quietly earns its place in a crafter's library. It is not flashy, but it is versatile. It stitches cleanly, appeals to a broad audience, and fits into a range of product categories without feeling forced. For embroidery designers, small shop owners, and anyone building a handmade product line, that kind of reliability is worth more than a dozen trendy designs that only work on one type of item.
Whether you are stitching a single personalized gift for a friend or building a full boutique collection around camping and outdoor themes, this camper motif brings a steady, grounded presence to the finished piece. It reminds me why I keep coming back to designs that feel like they have a story to tell, even if that story is as simple as a little trailer parked under the stars.